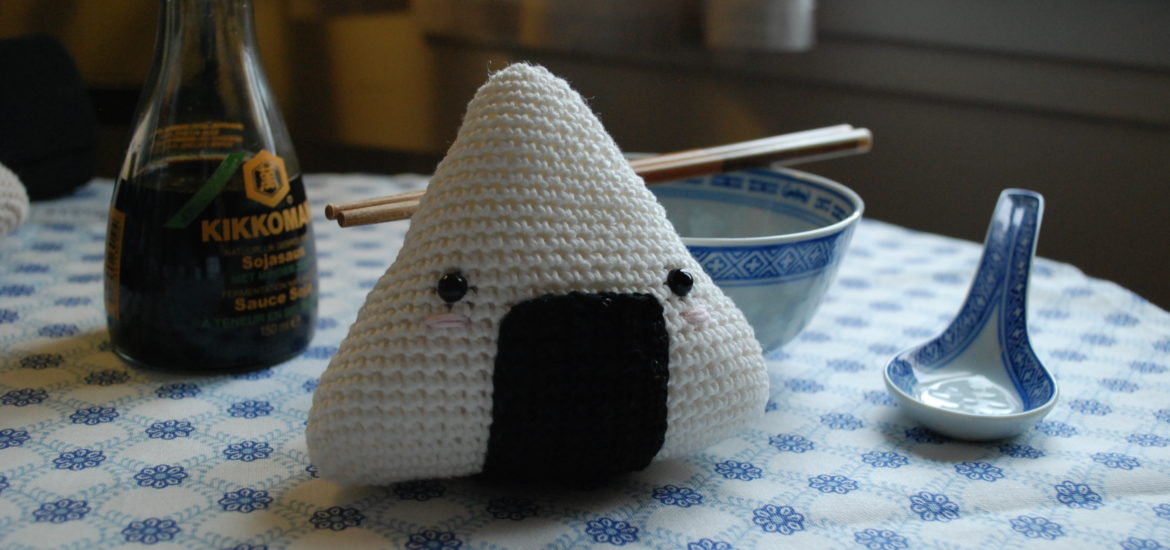
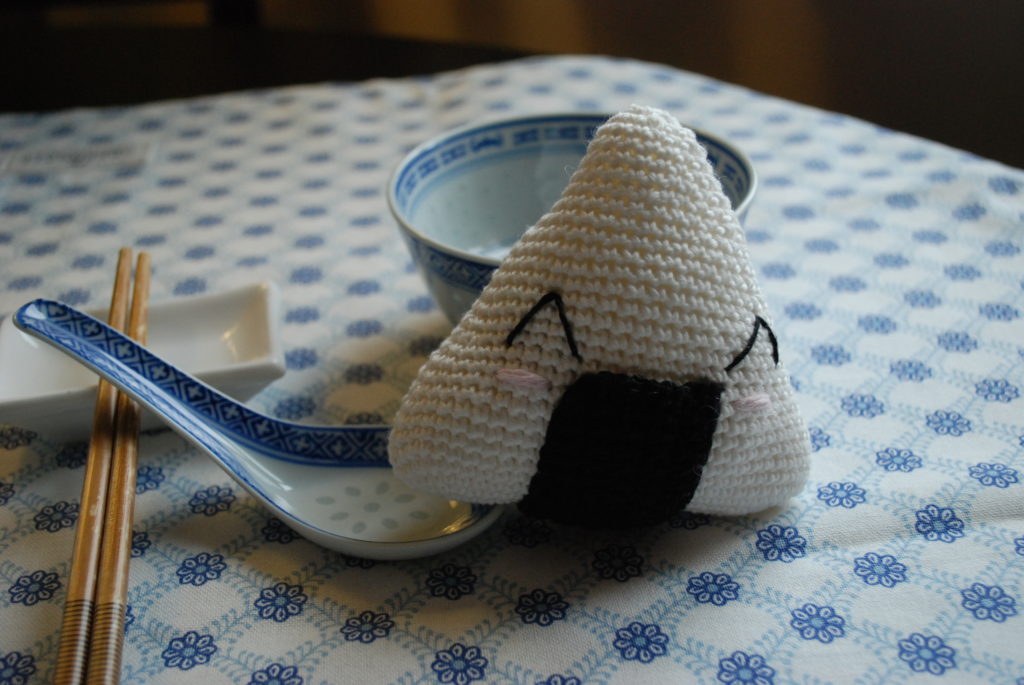
For my very first creation I’ve decided to share with you a crocheted onigiri pattern. It’s a really simple and quick project, perfect for beginners.
Why an onigiri you’ll ask… Impending explanation !
Incidentally and, for those of you a bit unclear as to what is an onigiri : it’s a japanese rice ball that’s shaped, most of the time, as a triangle and wrapped in nori (sort of seaweed). Traditionnally, an onigiri can be filled with a variety of ingredients (e.g. : sour plums, fish, cheese, etc.).
Making an onigiri really meant a lot to me because of a book series I’ve read as a teenager. Let me share a snippet with you, which made quite an impression on me back then :
“It’s like correlating people’s unique qualities to the delicious sour plum that can be put in a rice ball… Maybe we all carry a little plum…that shows at the back of our onigiri !
In this world, there are rice balls filled with all kind of wonderfully different ingredients… but they protrude at the back of our rice ball, so we can’t always see our own flavor.
We could be looking at ourselves thinking : “I’m just a plain, white-rice, little onigiri” even though it’s not quite true, is it ?
Because, turn around and look closely, we all carry a unique and delicious sour plum.
So perhaps, when we feel envious of others, that’s because we can clearly see theirs, right there on their back, when we’re a little blind to our own.”
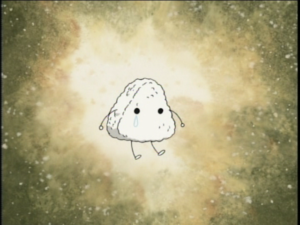
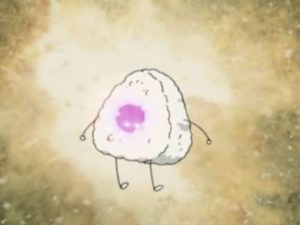
(for those of you wondering where this quote comes from: Fruits Basket, by Natsuki Takaya)
This analogy has helped me so many times (still does) to put things into perspective and to cheer me up when I find myself losing confidence or feeling like a total failure. That’s why I immediately thought that, by making this little rice ball, I could remind each and everyone of you guys that you are AWESOME. Period. Whenever you forget it, just tell yourself that your awesomeness is is right there, maybe escaping your immediate perception, but stamped on your back nonetheless.
Okay, now that I’ve shared way too much information about myself, let’s get to the fun part 🙂 ! If you want to crochet your own onigiri, you’ll find all the infos right down below.
Crocheted onigiri : just before you grab your crochet hook…
Materials
- 100 % cotton yarn :
- creamy white (for the rice ball),
- black (for the seaweed),
- pastel pink (just some leftovers for the cheeks).
- Crochet hook : 3 mm / C.
- Stitch marker.
- Tapestry needle.
- Embroidery scissors (any tiny scissors will do just fine).
- Black safety eyes – 4 mm (optional : you can easily embroider the eyes instead).
- Stuffing.

Pattern reading and notes
Abbreviations used in the pattern :
- st : stitch,
- ch : chain,
- s.c : single crochet,
- inc : increase,
- dec : decrease.
Other notes :
- [xx] : the number between the square brackets shows the total stitches you should have at the end of the row/round.
- (xxx) x 2 : the instructions between brackets should be repeated across the round a certain number of times (in this instance : twice).
- Reaching round 5 the rice ball tends to warp : it’s completely normal. This “warping” effect should be over when you’ve reached round 8.
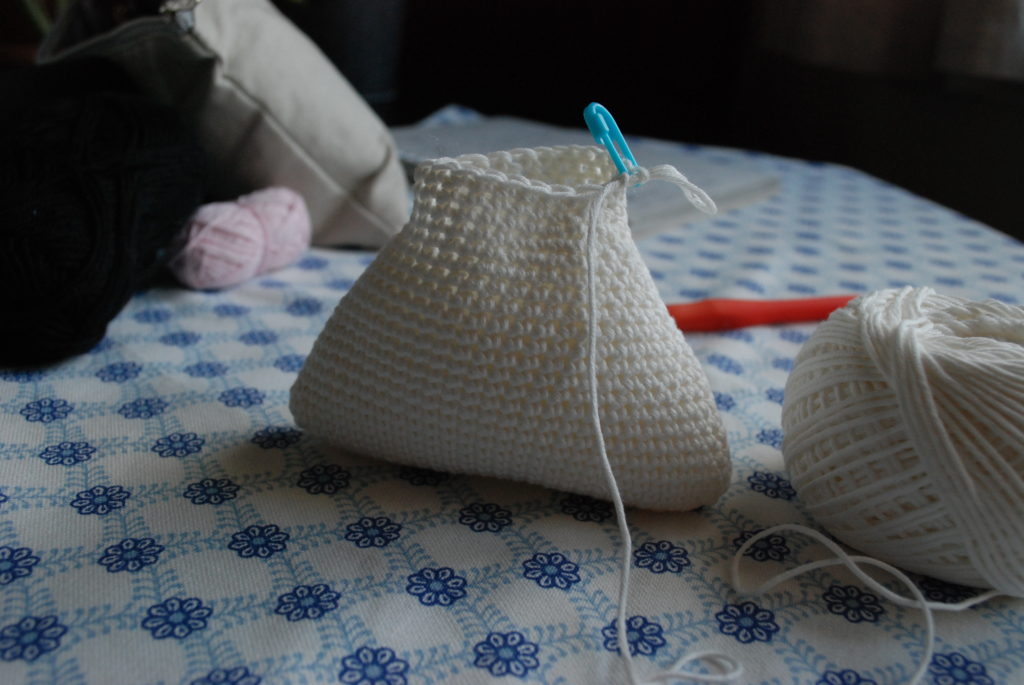
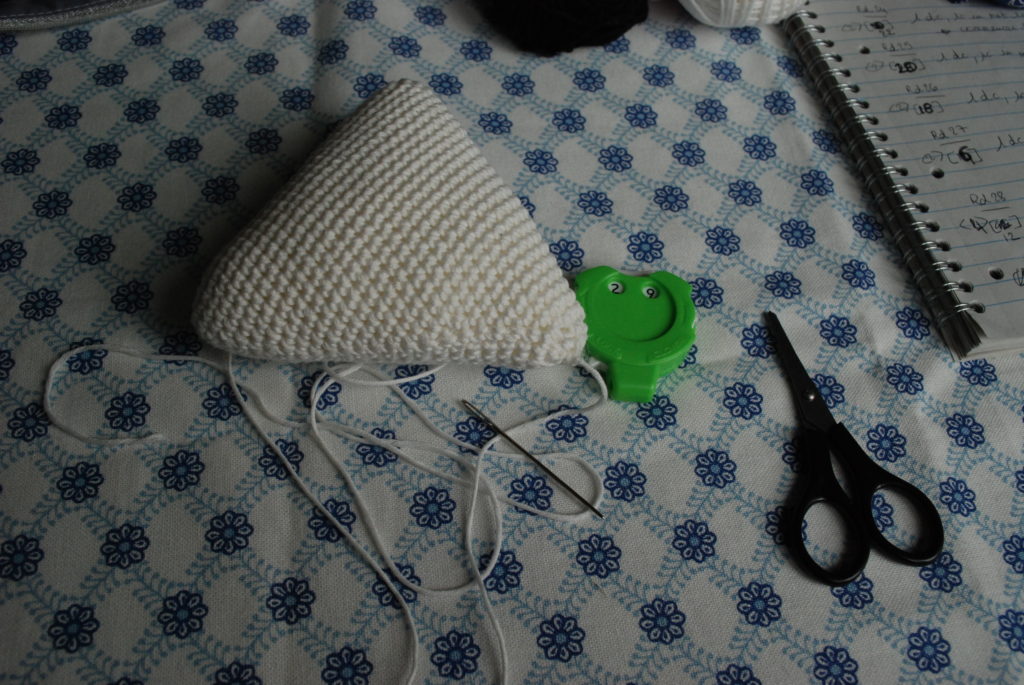
1st step of this free crochet pattern : the rice ball

Ch 21. We’ll be working around both sides of the foundation chain.
Rd 1 : inc in 2nd chain from hook, sc in next 18, 3 sc in next (last stitch of the foundation chain). Continue on the other side of the foundation chain : sc in next 19 [42]
Rd 2 : inc in next 2, sc in next 18, inc in next 3, sc in next 18, inc in last [48]
Rd 3 : inc in next 3, sc in next 20, inc in next 4, sc in next 20, inc in last [56]
Rd 4 : inc in next 4, sc in next 23, inc in next 5, sc in next 23, inc in last [66]
Rd 5 : sc in all [66]
Rd 6 : sc in next 2, 2 dc, sc in next 29, 2 dc, sc in next 27 [62]
Rd 7 : sc in next 2, 1 dc, sc in next 29, 1 dc, sc in next 27 [60]
Rd 8 : sc in next 2, 1 dc, sc in next 28, 1 dc, sc in next 26 [58]
Rd 9 : sc in next 2, 1 dc, sc in next 27, 1 dc, sc in next 25 [56]
Rd 10 : sc in next, 1 dc, sc in next 26, 1 dc, sc in next 25 [54]
Rd 11 : sc in next, 1 dc, sc in next 25, 1 dc, sc in next 24 [52]
Rd 12 : sc in next, 1 dc, sc in next 24, 1 dc, sc in next 23 [50]
Rd 13 : 1 dc, sc in next 21, 2 dc, sc in next 21, 1 dc [46]
Rd 14 : (1 dc, sc in next 21) x 2 [44]
Rd 15 : (1 dc, sc in next 20) x 2 [42]
Rd 16 : (1 dc, sc in next 19) x 2 [40]
Rd 17 : (1 dc, sc in next 18) x 2 [38]
Rd 18 : (1 dc, sc in next 17) x 2 [36]
Rd 19 : (1 dc, sc in next 16) x 2 [34]
Rd 20 : (1 dc, sc in next 15) x 2 [32]
Rd 21 : (1 dc, sc in next 14) x 2 [30]
Rd 22 : (2 dc, sc in next 11) x 2 [26]
Insert the safety eyes approximatively at round 12, leaving 12 stitches between them.

Rd 23 : (1 dc, sc in next 11) x 2 [24]
Rd 24 : (1 dc, sc in next 10) x 2 [22]
Stuff firmly the rice ball with fiberfill. Adjust the stuffing along the way til the end.
Rd 25 : (1 dc, sc in next 9) x 2 [20]
Rd 26 : (1 dc, sc in next 8) x 2 [18]
Rd 27 : (1 dc, sc in next 7) x 2 [16]
Rd 28 : (sc in next 2, dc). Repeat 4 times [12]
Rd 29 : dc in all 12 [6]
Fasten off, leaving a long tail. With a tapestry needle, weave the yarn tail through the front loop of each remaining stitch and tightly pull to close the rice ball. Weave in the yarn end.
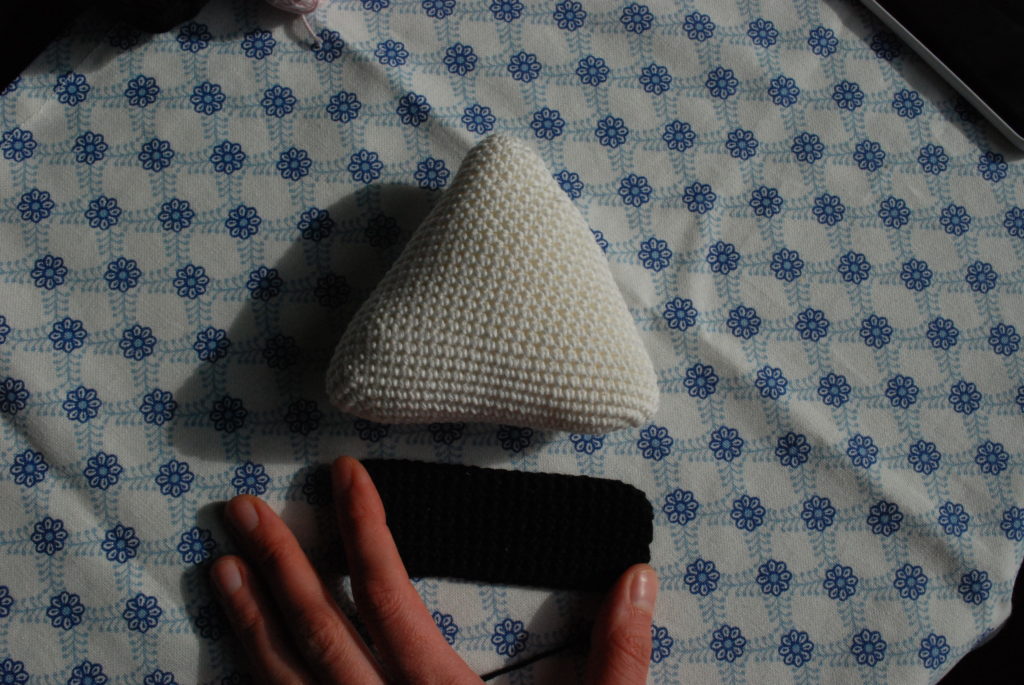
2nd step : the seaweed (nori)
Ch 25. Crochet in rows.
Row 1 : sc in 2nd chain from hook, sc in next 21 [24]
Intermediary step : Ch 1 and turn your work.
Row 2 – 11 : sc in all [24]
(Beware : don’t forget the intermediary step between each row).
Fasten off leaving a very long tail for sewing (better safe than sorry !).
Assembly of the crocheted onigiri
Before sewing the seaweed, adjust the piece on the rice ball and secure/pin the position (don’t be afraid to use a LOT of pins if you don’t want your nori to end up sewed in a “messy” way).
The top of the seaweed should be placed at row 11, centered between the eyes of the rice ball, a bit below.
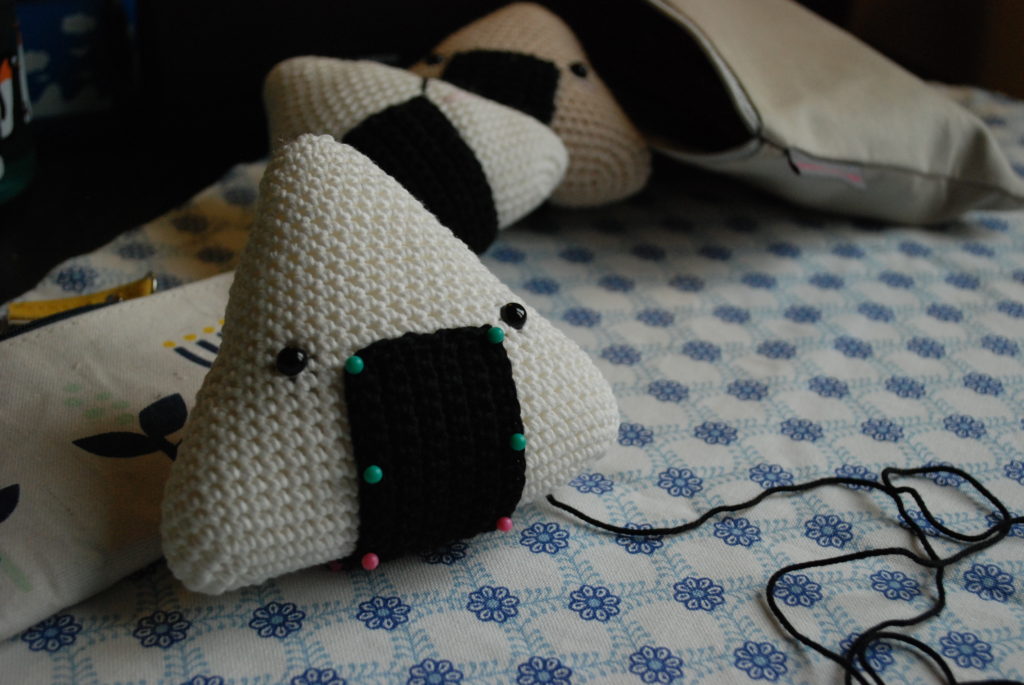
Sew the nori on the onigiri and weave in the yarn end.
At last, embroider the cheeks with pastel pink right under the eyes (if you didn’t chose to insert safety eyes, here is the time to embroider the eyes as well !).
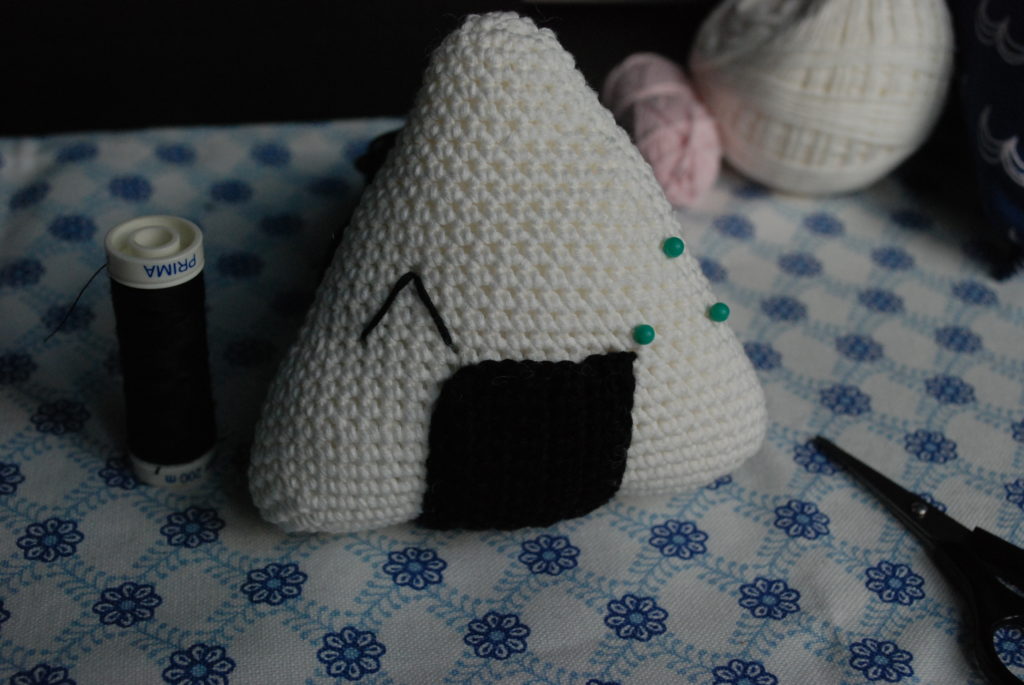
Congratulations, you’re done !
I hope you’ll enjoy this onigiri pattern as much as I had fun creating it. And most of all, that it will remind you of your uniqueness and inner strength !
Don’t hesitate to share your awesome creations with the hastag : #mylittleonigiri, to share where you got this pattern from (a.k.a moi !) and mostly, to give me some feedback if something is not crystal clear or if you notice a mistake in the pattern.
Thank you so much and have fun !

[…] Btw : if you want to give a try to my first free pattern, go see my little crocheted onigiri. […]